Self-Hosting a Logseq Sync Server
Local access with Tailscale, remote access with a reverse proxy
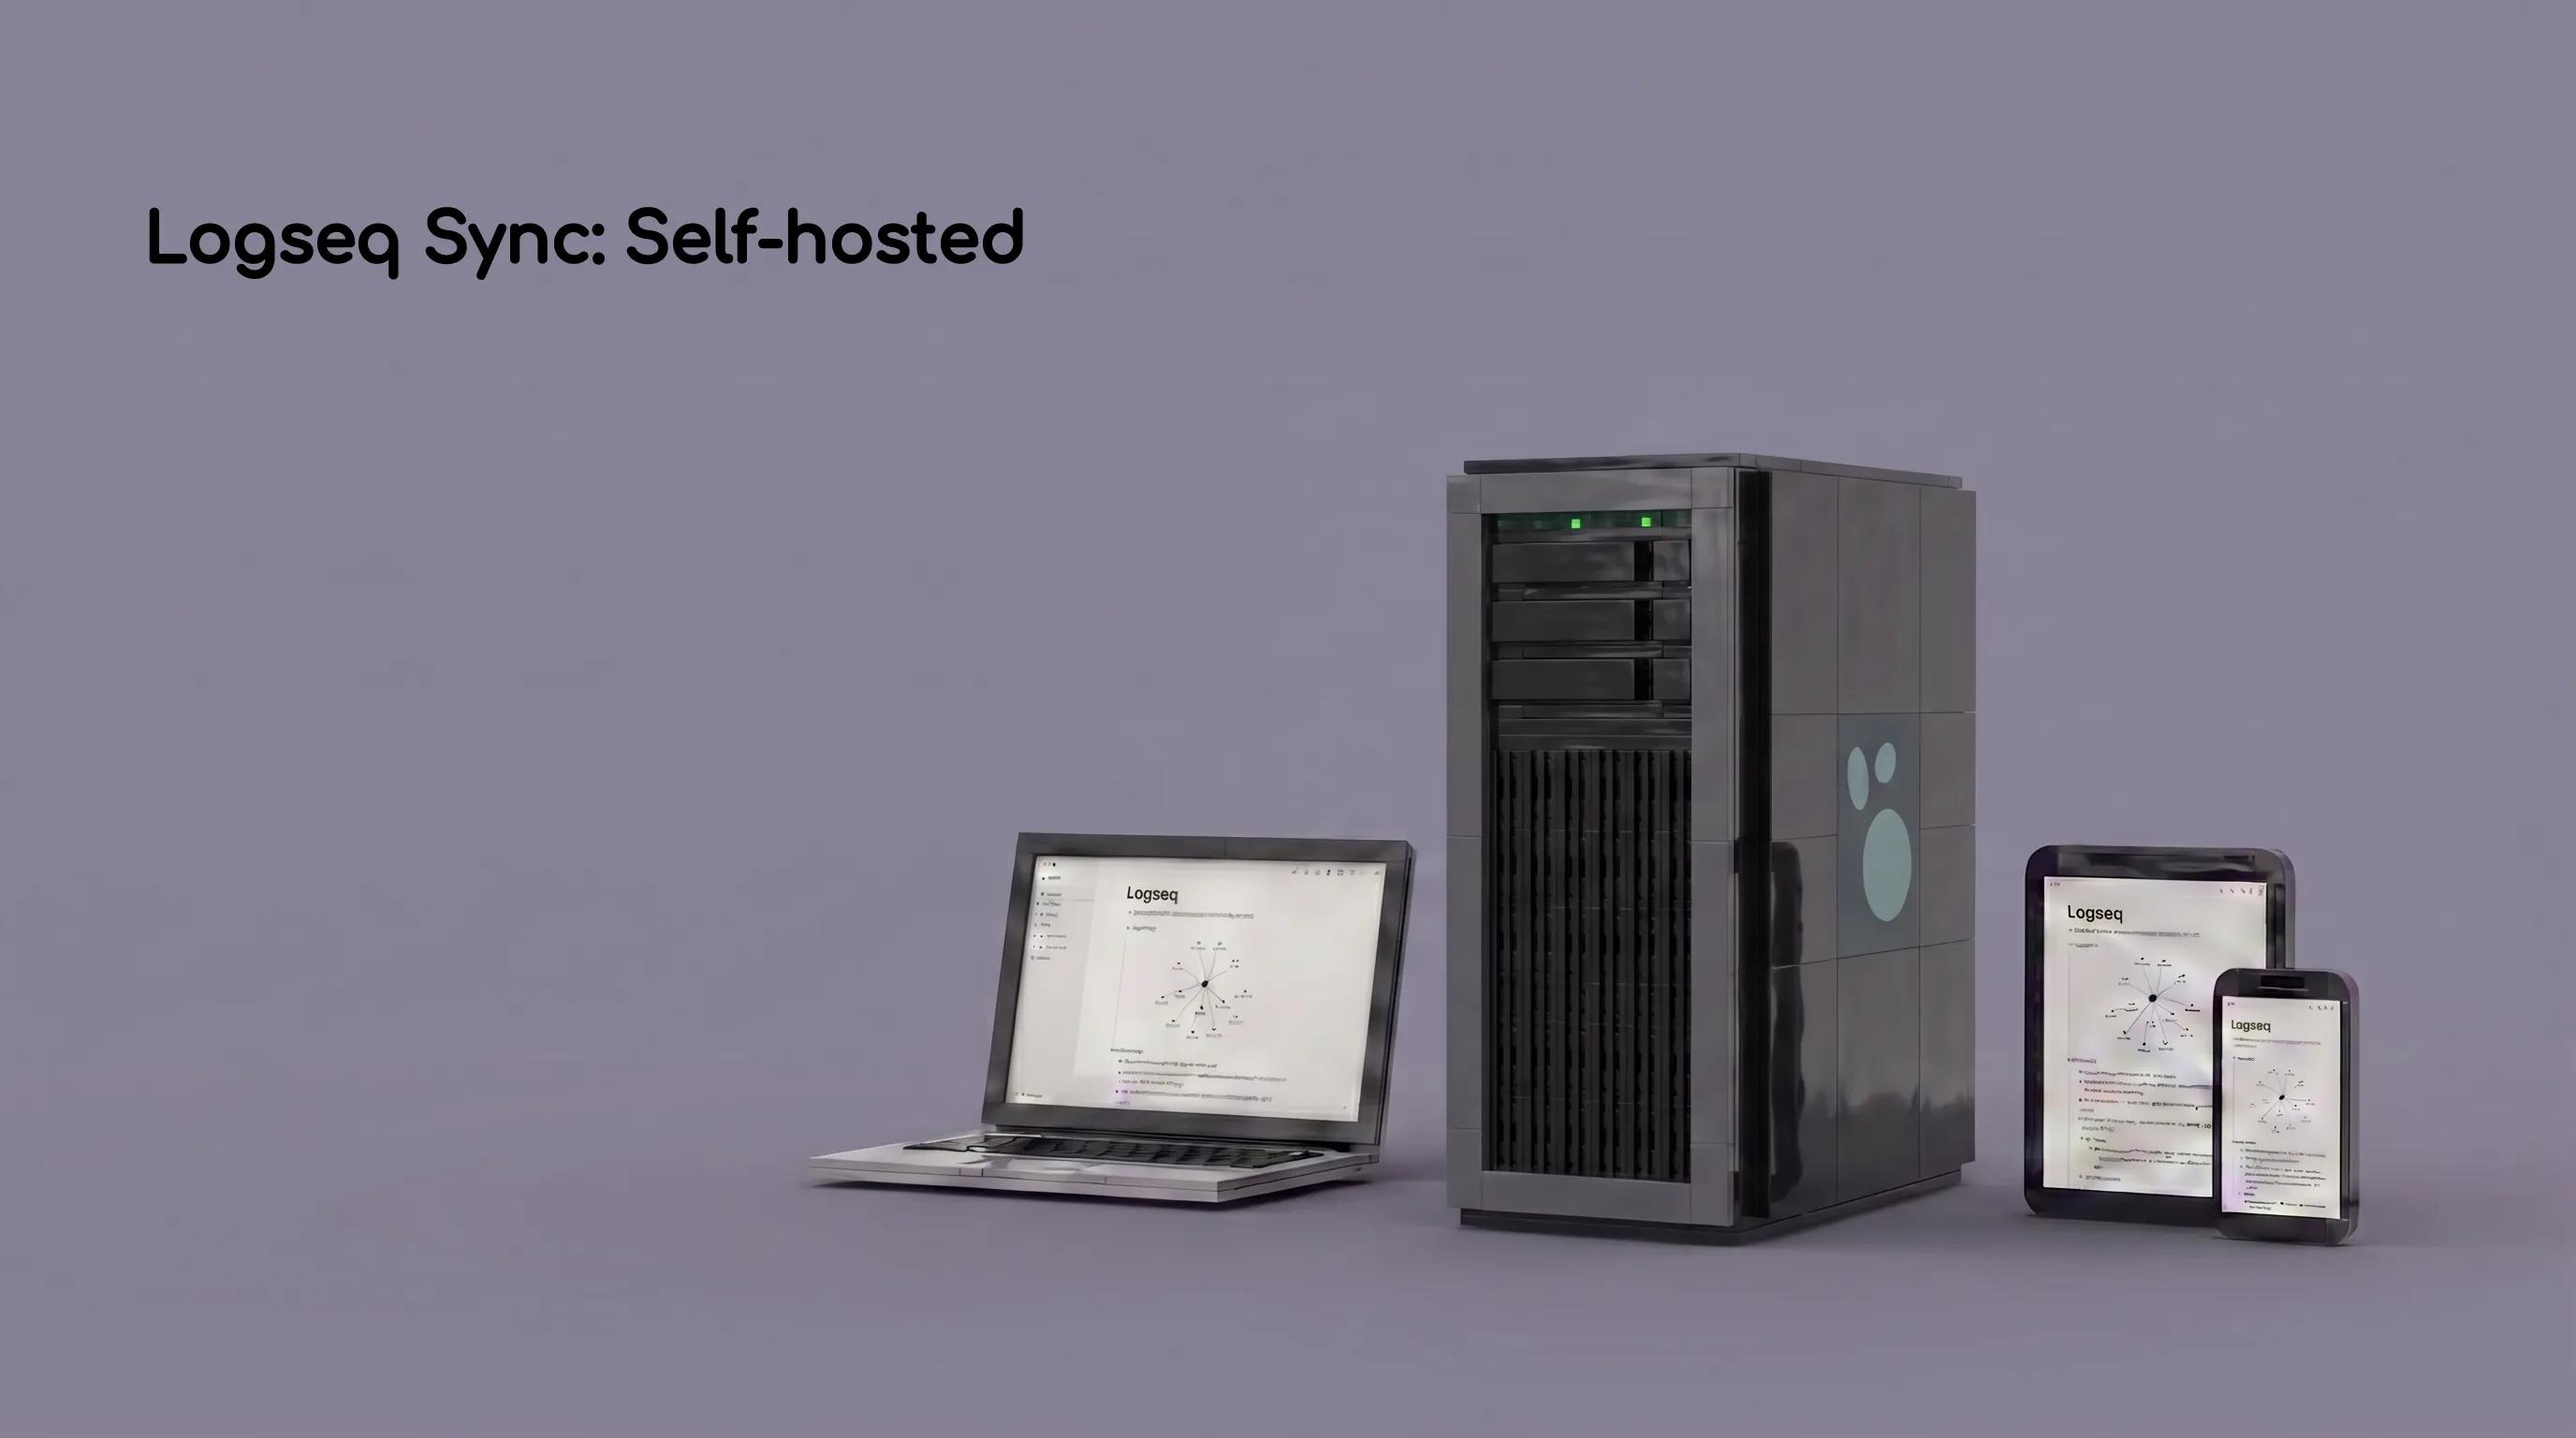
Logseq has undergone some transformative changes over the past few years, with the switch to the Database (DB) version that brings better performance, structured data entry, Real Time Collaboration (RTC) and a host of other features. The move away from storing notes in local markdown files also means that users can no longer rely on solutions like cloud folders (Google Drive, iCloud etc.) or Syncthing for syncing their notes across devices but now have to rely on Logseq’s official Sync services to enable cross-device access.
The official Logseq Sync service is a paid service that can currently be enabled by contributing to Logseq’s Open Collective at the “Backers” and “Sponsors” tiers. However, in the true spirit of Open Source, the developers have gracefully provided the infrastructure to self-host the Logseq Sync and Publish servers on our own hardware and the community has also built Docker containers (yshalsager’s logseq-selfhost) to make the self-hosted setup simpler.
This post walks through two ways of exposing that server:
- Private access over Tailscale: the quickest way to sync between your own devices without exposing the server to the public internet.
- Public access through a reverse proxy: useful when you need to sync from a device that cannot run Tailscale, such as a managed work computer.
Both approaches sit on top of the same logseq-selfhost containers: choose the Tailscale route if you’re syncing between your own devices, or the reverse proxy route if you need access from somewhere Tailscale can’t reach, like a managed work computer.
Common Prerequisites
Whichever access route you choose, you will need:
- Logseq account: Self-hosting replaces Logseq’s hosted Sync and Publish endpoints, but the current clients still require you to sign in with a Logseq account for authentication. You do not need a subscription while using the self-hosted route, only the account.
- Device capable of running Docker: A home server, NAS, desktop computer, or VPS.
- Docker Engine with Compose: On Linux, follow Docker’s official install guide; On MacOS and Windows, Docker Desktop includes the Compose plugin
- Git: For cloning the
logseq-selfhostrepository - Logseq DB clients: Client application for every device you want to sync
 Creating a Logseq Account
A Logseq account can be created using any of Logseq’s client applications or by navigating to test.logseq.com “” Login Sign Up.
The account created here will be used to authenticate all other clients for the sync operations.
Private access over Tailscale
Tailscale creates a private mesh network (a “tailnet”) between your devices, so the sync server never needs a public IP, a domain, or a certificate: you just point your Logseq clients at the server’s Tailscale IP address.
Ensure Tailscale is installed and signed in on the server and on every device you want to sync from.
Setup
- Install Tailscale on the server and on each client device, then note the Tailscale IP address assigned to the server (visible in the Tailscale admin console, or by running
tailscale ip -4on the server itself).

-
Clone the repository and prepare the environment file:
git clone https://github.com/yshalsager/logseq-selfhost.git cd logseq-selfhost/images/sync cp .env.example .env -
Point the sync server at your Tailscale IP. Open
.envand change:DB_SYNC_BASE_URL=https://sync.example.comto:
DB_SYNC_BASE_URL=http://YOUR_TAILSCALE_IP:8787 -
Start the server:
docker compose pull docker compose up -d -
Verify it’s running:
curl http://localhost:8787/healthshould return:
{"ok":true}
Once the health endpoint is reachable from another device on your tailnet, continue to Connecting your Logseq clients and use:
http://YOUR_TAILSCALE_IP:8787
You can optionally enable MagicDNS in Tailscale and use a memorable address such as
http://my-server:8787instead of the server’s Tailscale IP.
One thing worth flagging: the sync server listens on port 8787 by default, and Tailscale does not close that port to the rest of your network, it only gives your devices a private way to reach it. If your server also has a LAN or public IP, take a moment to confirm nothing outside your tailnet can reach port 8787, either with a firewall rule or by checking your router is not forwarding it.
Most firewalls can scope that rule to Tailscale’s own IP range (100.64.0.0/10) rather than opening the port to everyone.
 Public access through a reverse proxy
If you want to sync from outside your tailnet, or cannot install Tailscale on a device, you can place the same Sync server behind NGINX Proxy Manager (NPM) and access it through a normal HTTPS domain.
I chose NGINX Proxy Manager (NPM) as I already have a server stack running with NPM to connect to. NPM can be replaced with your reverse-proxy manager of choice.
Prerequisites
- NGINX Proxy Manager already installed and running, with a Docker network that the Logseq container can join.
- A domain with a DNS provider, with the ability to create and edit DNS records (this guide uses Cloudflare)
- Ports 80 and 443 forwarded to NGINX Proxy Manager from your router or firewall.
Setup
-
Create a deployment directory containing
docker-compose.ymland.env, with persistent data stored in a./datasubdirectory:mkdir -p ~/home-server/logseq-sync/data cd ~/home-server/logseq-syncAdditional config for Linux Users
Linux bind-mount permissions: The container runs as the unprivileged user
nonrootwith UID/GID65532:65532. On native Linux, or when the deployment directory is stored inside the WSL Linux filesystem, the bind-mounteddatadirectory may need to be owned by this UID:sudo chown -R 65532:65532 ~/home-server/logseq-sync/data sudo chmod 750 ~/home-server/logseq-sync/dataDocker Desktop users on macOS, and Windows users mounting a folder from the Windows filesystem, normally do not need this step. Keep the directory owned by your normal host user unless the container reports a permission error.
-
Create the environment file (
.env):DB_SYNC_BASE_URL=https://logseq-sync.example.com DB_SYNC_ADMIN_TOKEN=replace-with-random-tokenGenerate the token with:
openssl rand -hex 32 -
Create
docker-compose.yml:name: logseq-selfhost-sync services: logseq-sync: image: ghcr.io/yshalsager/logseq-selfhost-sync:latest container_name: logseq-selfhost-sync restart: unless-stopped pull_policy: always environment: DB_SYNC_PORT: "8787" DB_SYNC_BASE_URL: "${DB_SYNC_BASE_URL}" DB_SYNC_DATA_DIR: "/app/data" DB_SYNC_STORAGE_DRIVER: "sqlite" DB_SYNC_ASSETS_DRIVER: "filesystem" DB_SYNC_LOG_LEVEL: "info" COGNITO_ISSUER: "https://cognito-idp.us-east-1.amazonaws.com/us-east-1_dtagLnju8" COGNITO_CLIENT_ID: "69cs1lgme7p8kbgld8n5kseii6" COGNITO_JWKS_URL: "https://cognito-idp.us-east-1.amazonaws.com/us-east-1_dtagLnju8/.well-known/jwks.json" DB_SYNC_ADMIN_TOKEN: "${DB_SYNC_ADMIN_TOKEN}" volumes: - ./data:/app/data read_only: true tmpfs: - /tmp cap_drop: - ALL security_opt: - no-new-privileges:true networks: - default - nginx-proxy-manager_default networks: nginx-proxy-manager_default: external: trueThis Compose configuration makes two deliberate changes from the upstream yshalsager’s
logseq-selfhostexample:-
./data:/app/datais a bind mount, so the sync database and uploaded assets are stored in thedatadirectory beside the Compose file rather than in a Docker-managed volume. The data therefore persists when the container is recreated and can be included in your normal server backups. - The service has no
ports:section, so port8787is not published directly on the Docker host. Instead, the Logseq container joins the same Docker network as NGINX Proxy Manager, which can reach it internally atlogseq-selfhost-sync:8787. Only NGINX Proxy Manager needs to expose ports80and443to the host and the wider network.
The network name must match the Docker network used by your NPM deployment. You can find it by running:
docker network ls -
-
Set up DNS. Create a record pointing at your infrastructure:
logseq-sync.example.com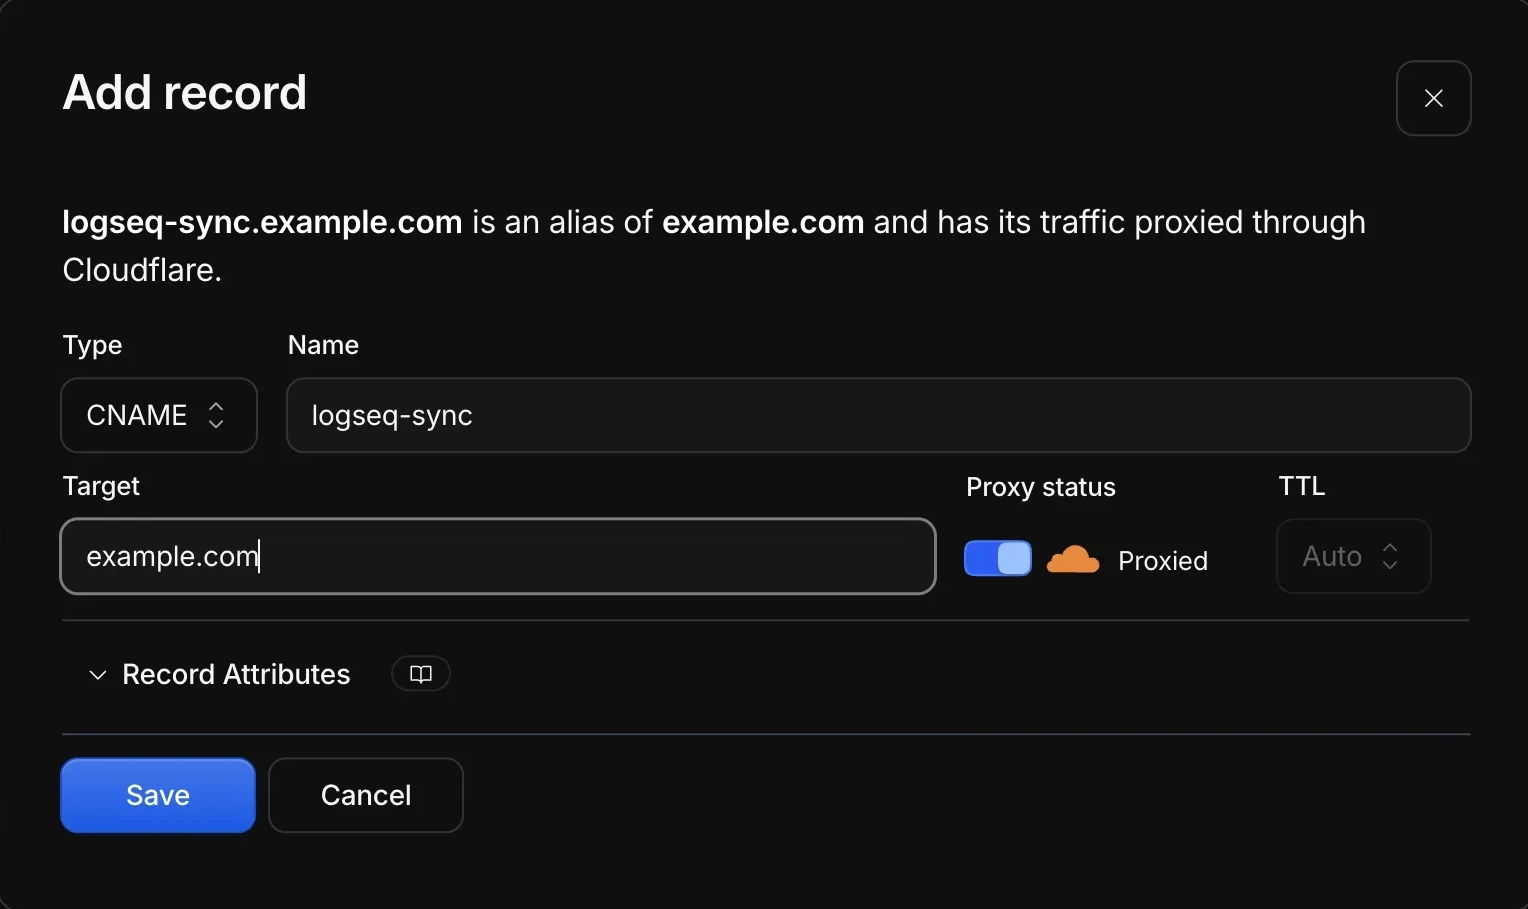
Adding a CNAME record for the Sync subdomain in the Cloudflare dashboard. -
Start the container:
docker compose pull docker compose up -d -
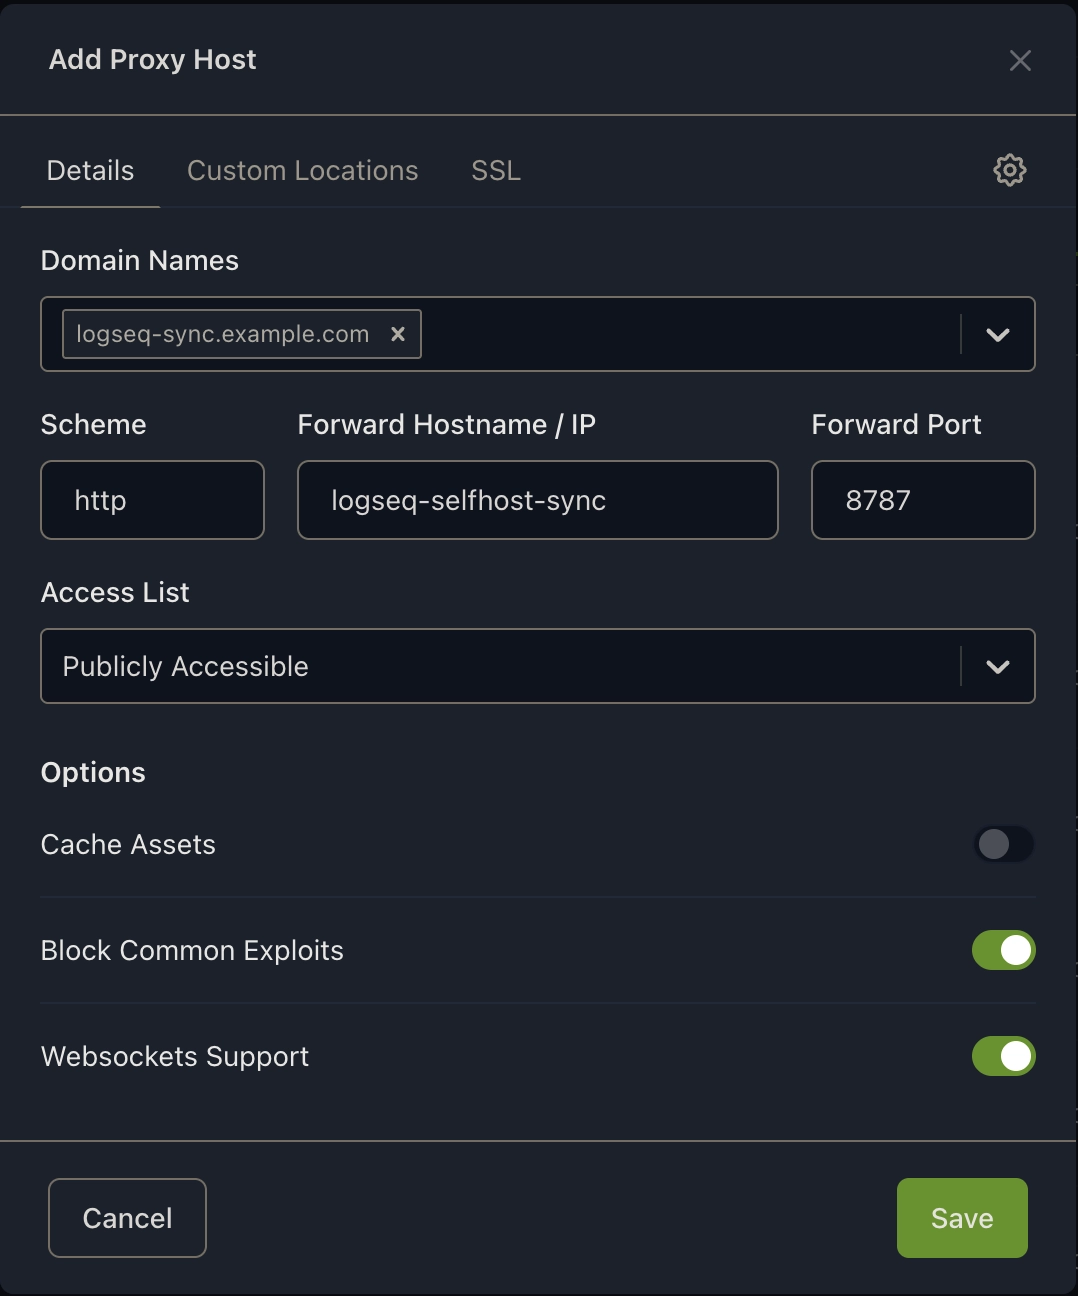
Create a proxy host in NGINX Proxy Manager:
Setting Value Domain name logseq-sync.example.comScheme httpForward hostname logseq-selfhost-syncForward port 8787
Enable Websockets Support and Block Common Exploits
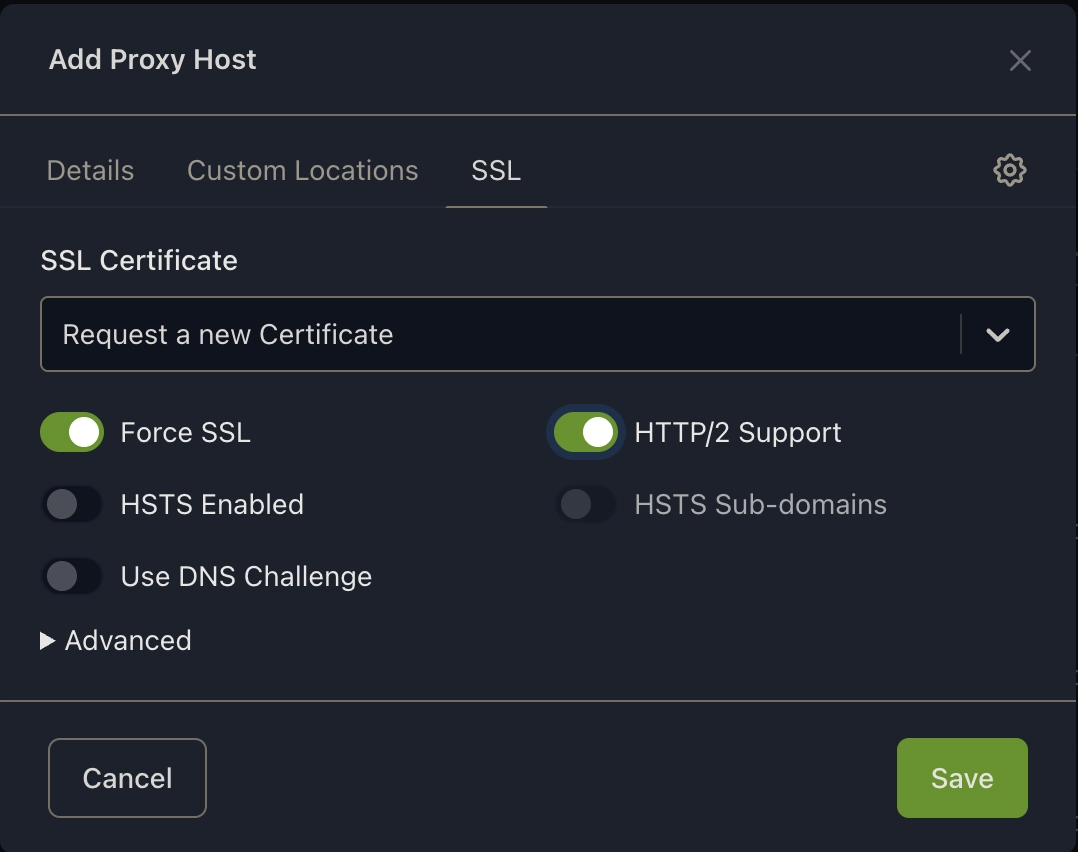
Under the “SSL” tab, enable Force SSL and HTTP/2 Support and request a new certificate:
Under Advanced (the settings icon), add:
client_max_body_size 1024m;
proxy_read_timeout 3600s;
proxy_send_timeout 3600s;

The longer
proxy_read_timeout/proxy_send_timeoutvalues matter here: Logseq Sync operations on large graphs can take a while, and NPM’s defaults will otherwise cut the connection early.
Verification
docker compose ps

curl -i https://logseq-sync.example.com/health
should return:
{"ok":true}
Once the public health endpoint is working, continue to Connecting your Logseq clients and use:
https://logseq-sync.example.com
A note on security
If you adapt this compose file for your own setup, keep the hardening defaults intact: read-only filesystems, dropped capabilities, and no ports published directly on the host. Together they mean the container has little room to do anything beyond running the sync service, even if something in it were compromised.
Alternative: Cloudflare Tunnel without port forwarding
Some internet providers use carrier-grade NAT or otherwise prevent customers from forwarding ports on their router. In that situation, a Cloudflare Tunnel can publish the Sync server without opening ports 80, 443, or 8787.
Instead of accepting an inbound connection from the internet, a small cloudflared container establishes an outbound connection to Cloudflare. Requests to your Sync hostname travel through that tunnel and are forwarded directly to the Logseq container over Docker’s internal network.
This method does not require NGINX Proxy Manager, but it reuses the same deployment directory, bind-mount, and .env pattern from steps 1–2 of the reverse-proxy setup above — including the Linux permissions note if you’re on native Linux or WSL. Create that directory and .env file first if you haven’t already.
Prerequisites
You will need:
- A Cloudflare account.
- A domain using Cloudflare DNS.
- A server capable of making outbound internet connections.
- Docker Engine with Compose.
1. Create the tunnel
Open the Cloudflare dashboard and navigate to:
Networking → Tunnels → Create tunnel
Give the tunnel a descriptive name, such as:
logseq-sync
Choose Docker as the deployment environment. Cloudflare will display a command containing a long tunnel token after the --token argument of the command
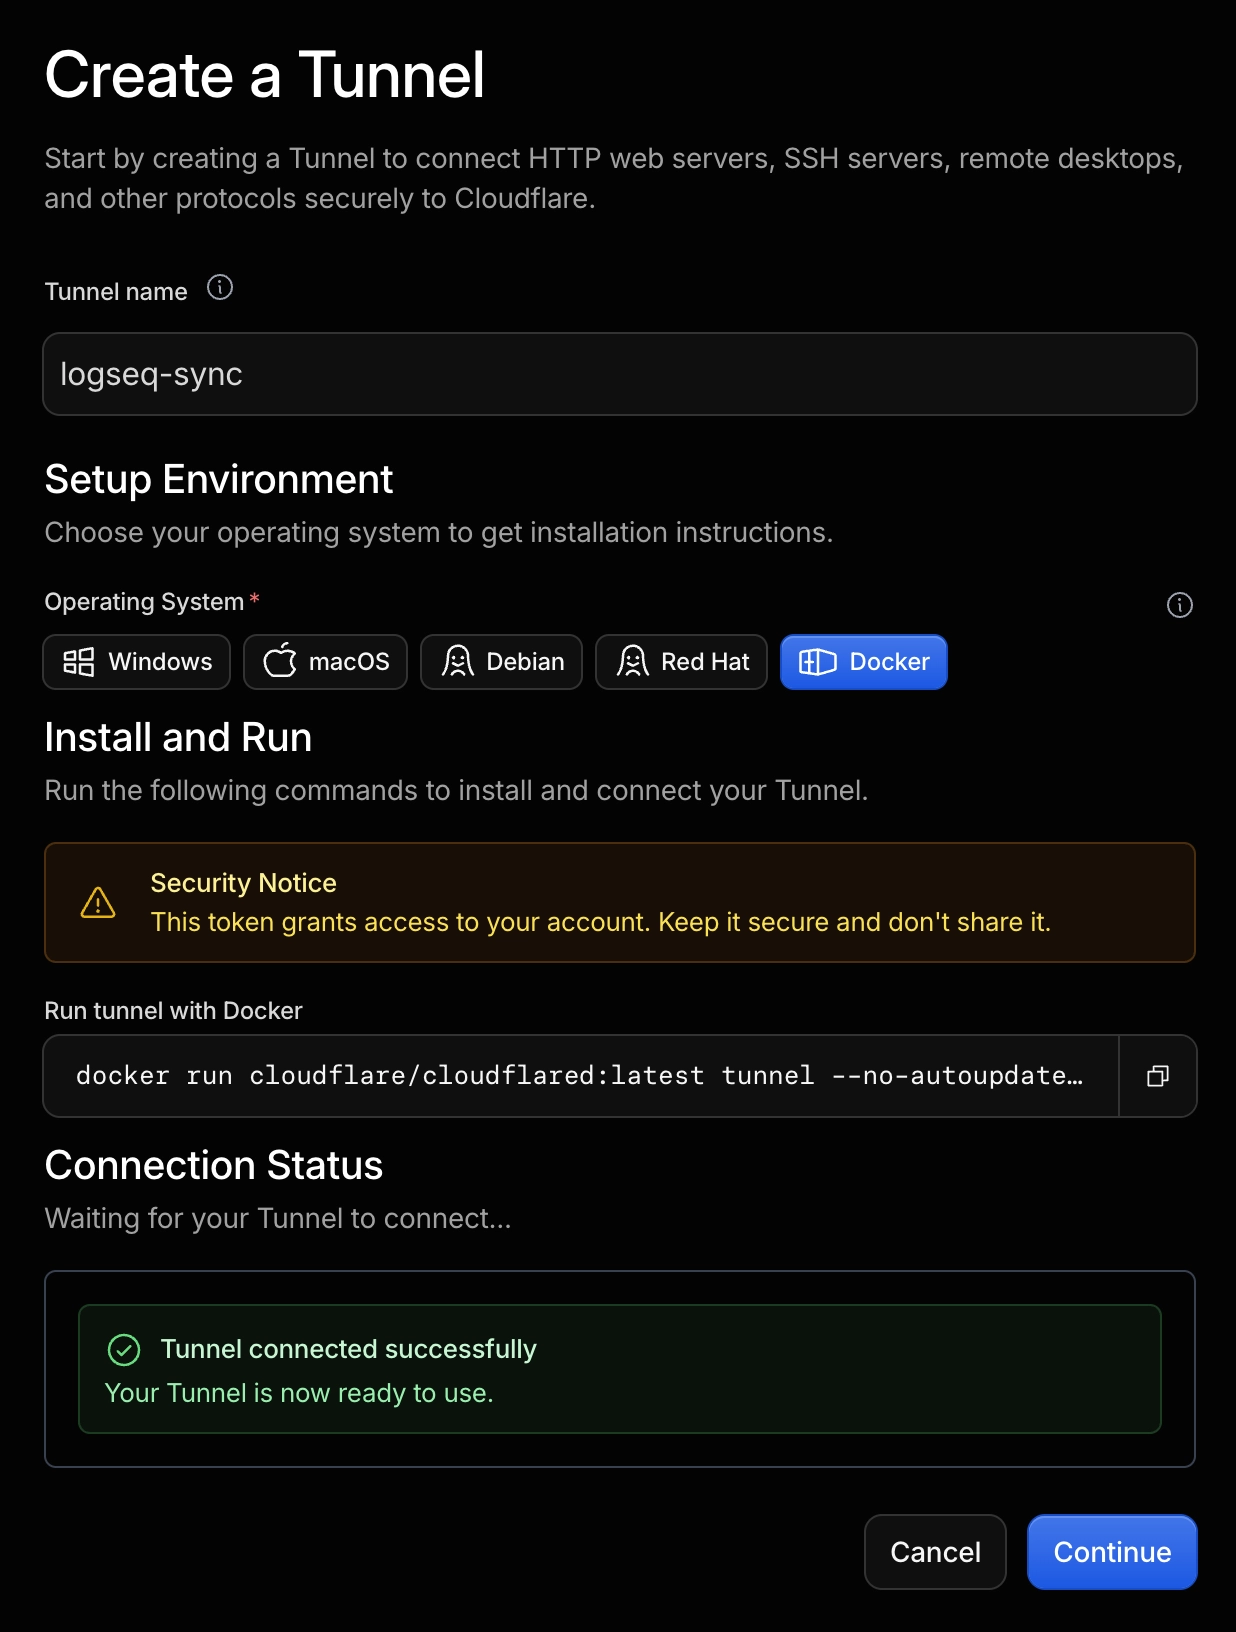
Copy only the token and add it to the .env file alongside the variables from step 2 above:
CLOUDFLARE_TUNNEL_TOKEN=<Copied from the docker run command>
Treat the tunnel token as a password. Do not commit the .env file to Git or publish it in your Compose file.
2. Create the Compose configuration
Start from the docker-compose.yml in step 3 above. Change the logseq-sync service’s networks: entry to logseq-tunnel, drop nginx-proxy-manager_default, and add a cloudflared service:
services:
  logseq-sync:
    # ...unchanged from step 3 above...

    networks:
      - logseq-tunnel

  cloudflared:
    image: cloudflare/cloudflared:latest
    container_name: logseq-cloudflared
    restart: unless-stopped
    pull_policy: always

    command:
      - tunnel
      - --no-autoupdate
      - run

    environment:
      TUNNEL_TOKEN: "${CLOUDFLARE_TUNNEL_TOKEN}"

    depends_on:
      - logseq-sync

    networks:
      - logseq-tunnel

networks:
  logseq-tunnel:
This configuration deliberately contains no ports: section. Neither container publishes a port on the Docker host; logseq-sync and cloudflared communicate only through the private logseq-tunnel Docker network.
3. Configure the published hostname
Return to the tunnel in the Cloudflare dashboard and add a Published application route.
Use the following values:
| Setting | Value |
|---|---|
| Subdomain | logseq-sync |
| Domain | example.com |
| Path | (leave empty) |
| Service URL | http://logseq-sync:8787 |
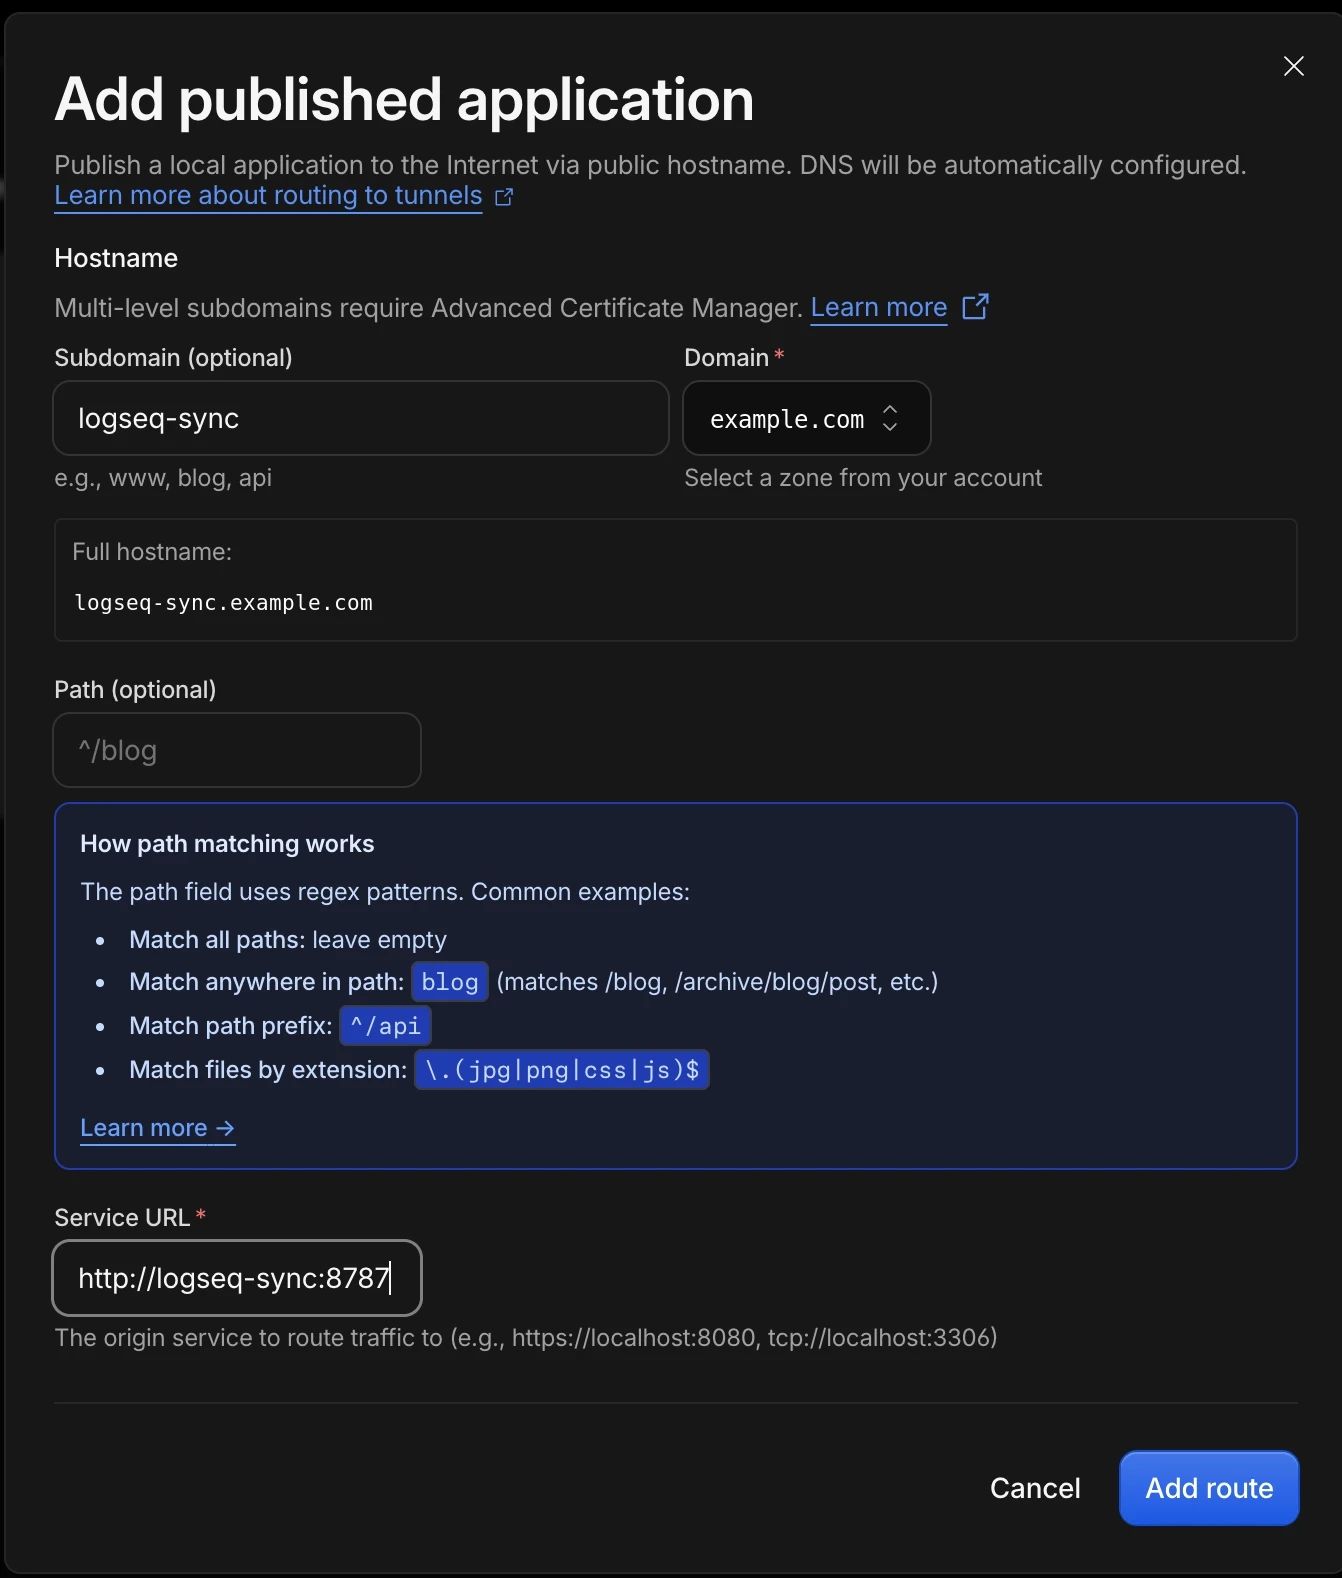
The service URL uses the Docker Compose service name, not the server’s LAN address. Because cloudflared and logseq-sync share the same Docker network, cloudflared can resolve that name internally.
The public URL must match DB_SYNC_BASE_URL:
https://logseq-sync.example.com
Cloudflare terminates the public HTTPS connection. Communication between cloudflared and the Logseq container remains internal to the Docker host and therefore uses HTTP.
4. Start the containers
From the deployment directory, run:
docker compose pull
docker compose up -d
Check that both containers are running:
docker compose ps
You can inspect the tunnel connection with:
docker compose logs cloudflared
5. Test the public endpoint
Test the health endpoint through Cloudflare:
curl https://logseq-sync.example.com/health
It should return:
{ "ok": true }
You can then enter the following as the custom Sync server URL in Logseq:
https://logseq-sync.example.com
A Cloudflare Tunnel avoids opening inbound ports, but the hostname is still publicly reachable through Cloudflare. Authentication is still provided by the Logseq account and Cognito configuration; the tunnel itself should not be treated as an authentication mechanism.
Cloudflare Tunnel supports WebSockets automatically, so there is no equivalent of NGINX Proxy Manager’s Websockets Support switch to enable.
Avoid placing an interactive Cloudflare Access login page in front of the Sync hostname unless you have verified that the Logseq client can complete that authentication flow. A browser-based challenge may prevent the desktop or mobile client from reaching the Sync API.
Optional: bypass Cloudflare caching
The Sync hostname serves changing API data rather than a conventional static website. To avoid unexpected caching behaviour, create a Cloudflare Cache Rule matching:
Hostname equals logseq-sync.example.com
and set:
Cache eligibility: Bypass cache
Upload-size limitation
Traffic sent through a Cloudflare Tunnel is subject to Cloudflare’s proxied request-size limits. Free and Pro zones currently allow request bodies of up to 100 MB; larger individual asset uploads may return a 413 Payload Too Large response.
Connecting your Logseq clients
The client setup is the same for both access routes. The only difference is the Sync server URL:
| Access route | Sync server URL |
|---|---|
| Tailscale | http://YOUR_TAILSCALE_IP:8787 |
| Reverse proxy | https://logseq-sync.example.com |
Use the appropriate URL on every device you want to synchronize.
Desktop
The latest Desktop client builds can be downloaded from Logseq’s GitHub: choose the installer appropriate for your OS.
In Logseq, login with your Logseq account (see Creating a Logseq Account), then go to Settings → Advanced → Sync Server URL and enter your Sync server URL.
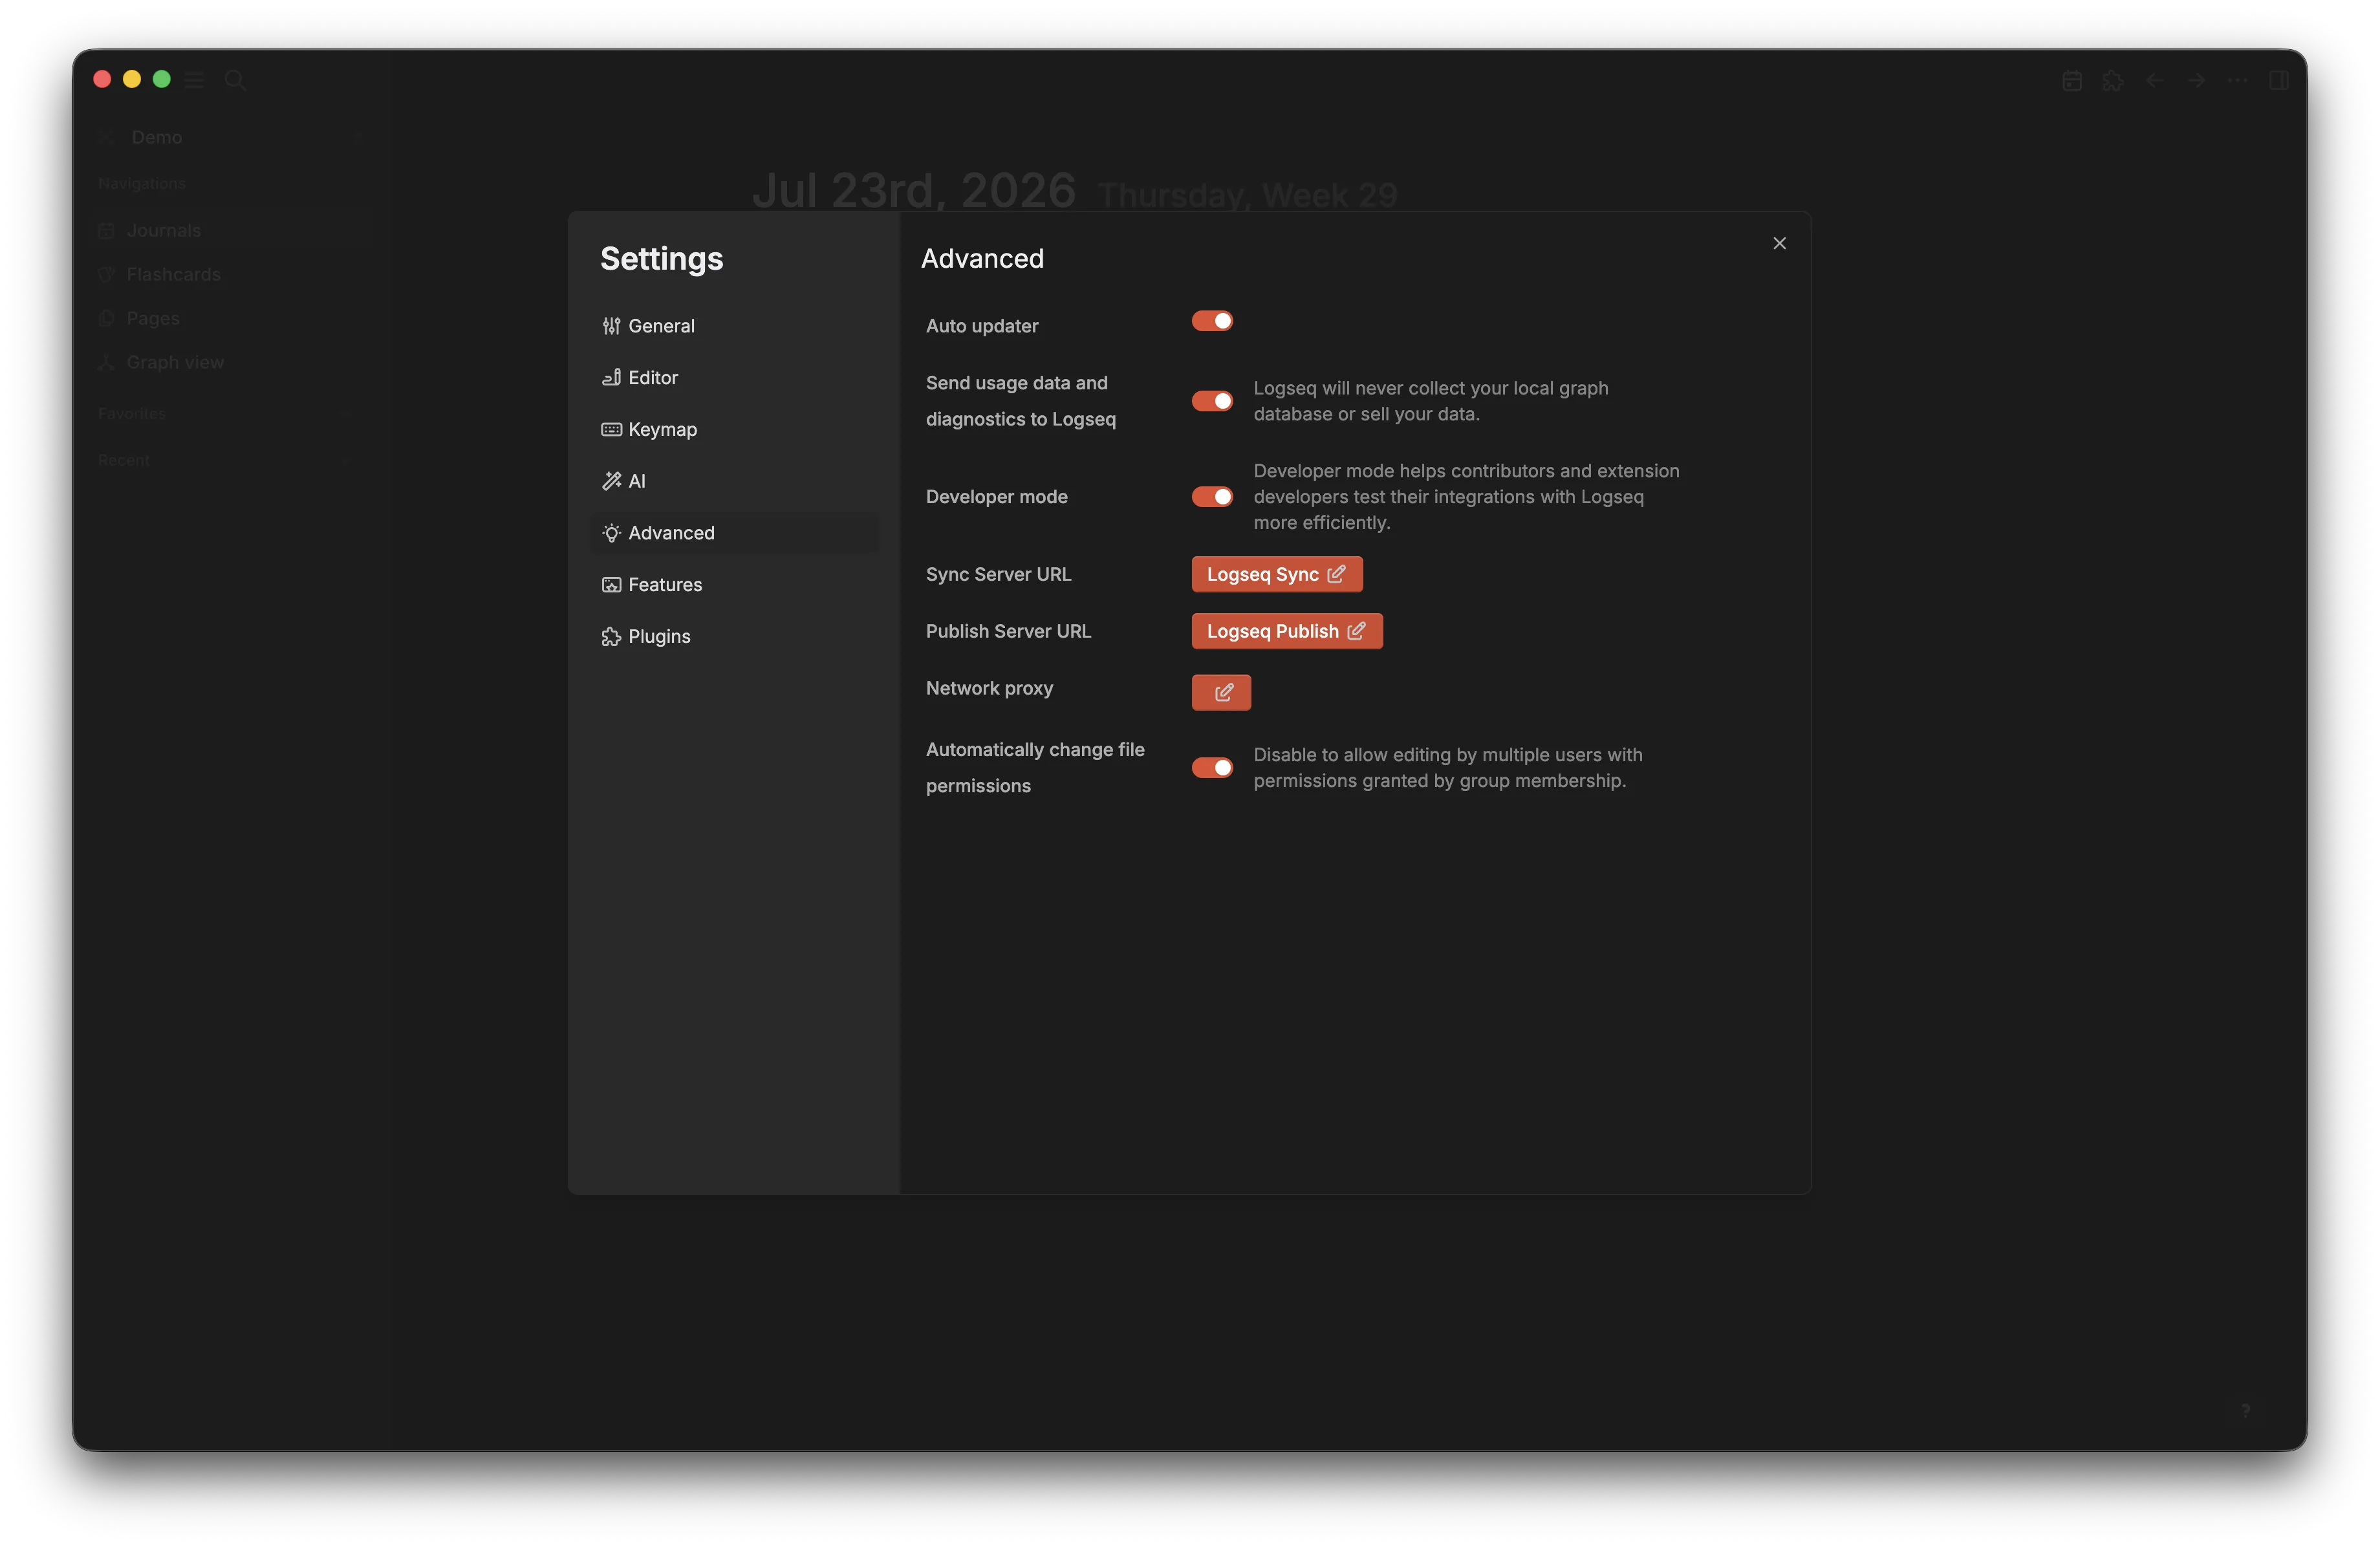
If successful, you should see a cloud icon with a green dot signalling the sync status in the top right corner, next to . Clicking on it will display the current sync status.
iPhone and iPad
The iOS/iPadOS clients for Logseq DB can be downloaded by joining the TestFlight program for the Logseq Beta app.
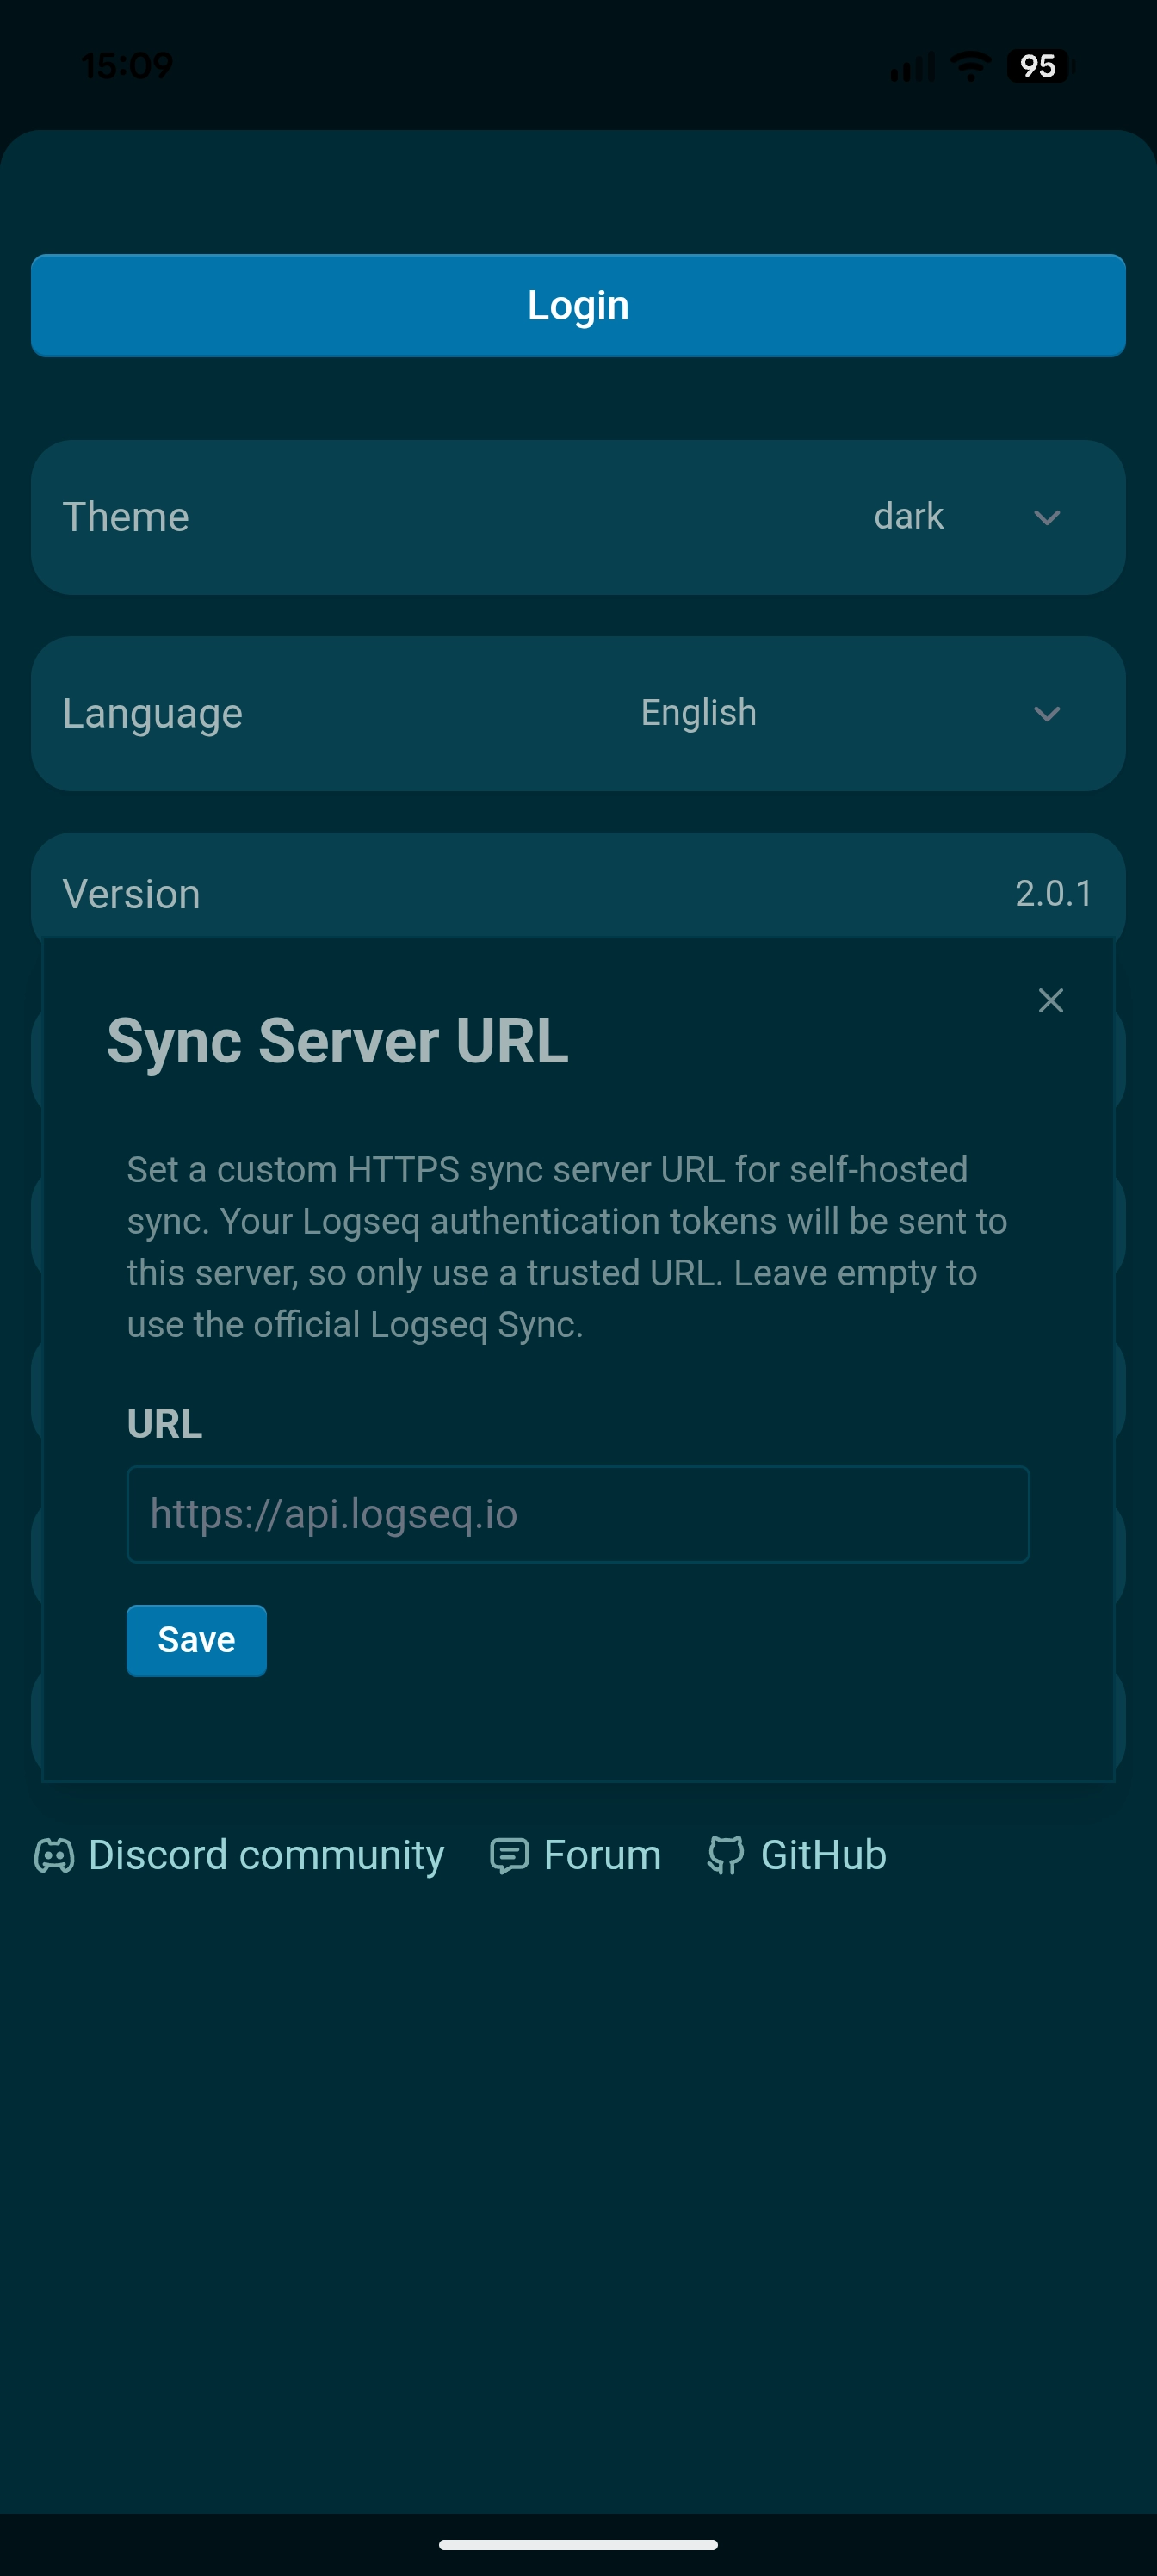
In Logseq, login with your Logseq account (see Creating a Logseq Account), then add your server url to the Sync Server URL setting.
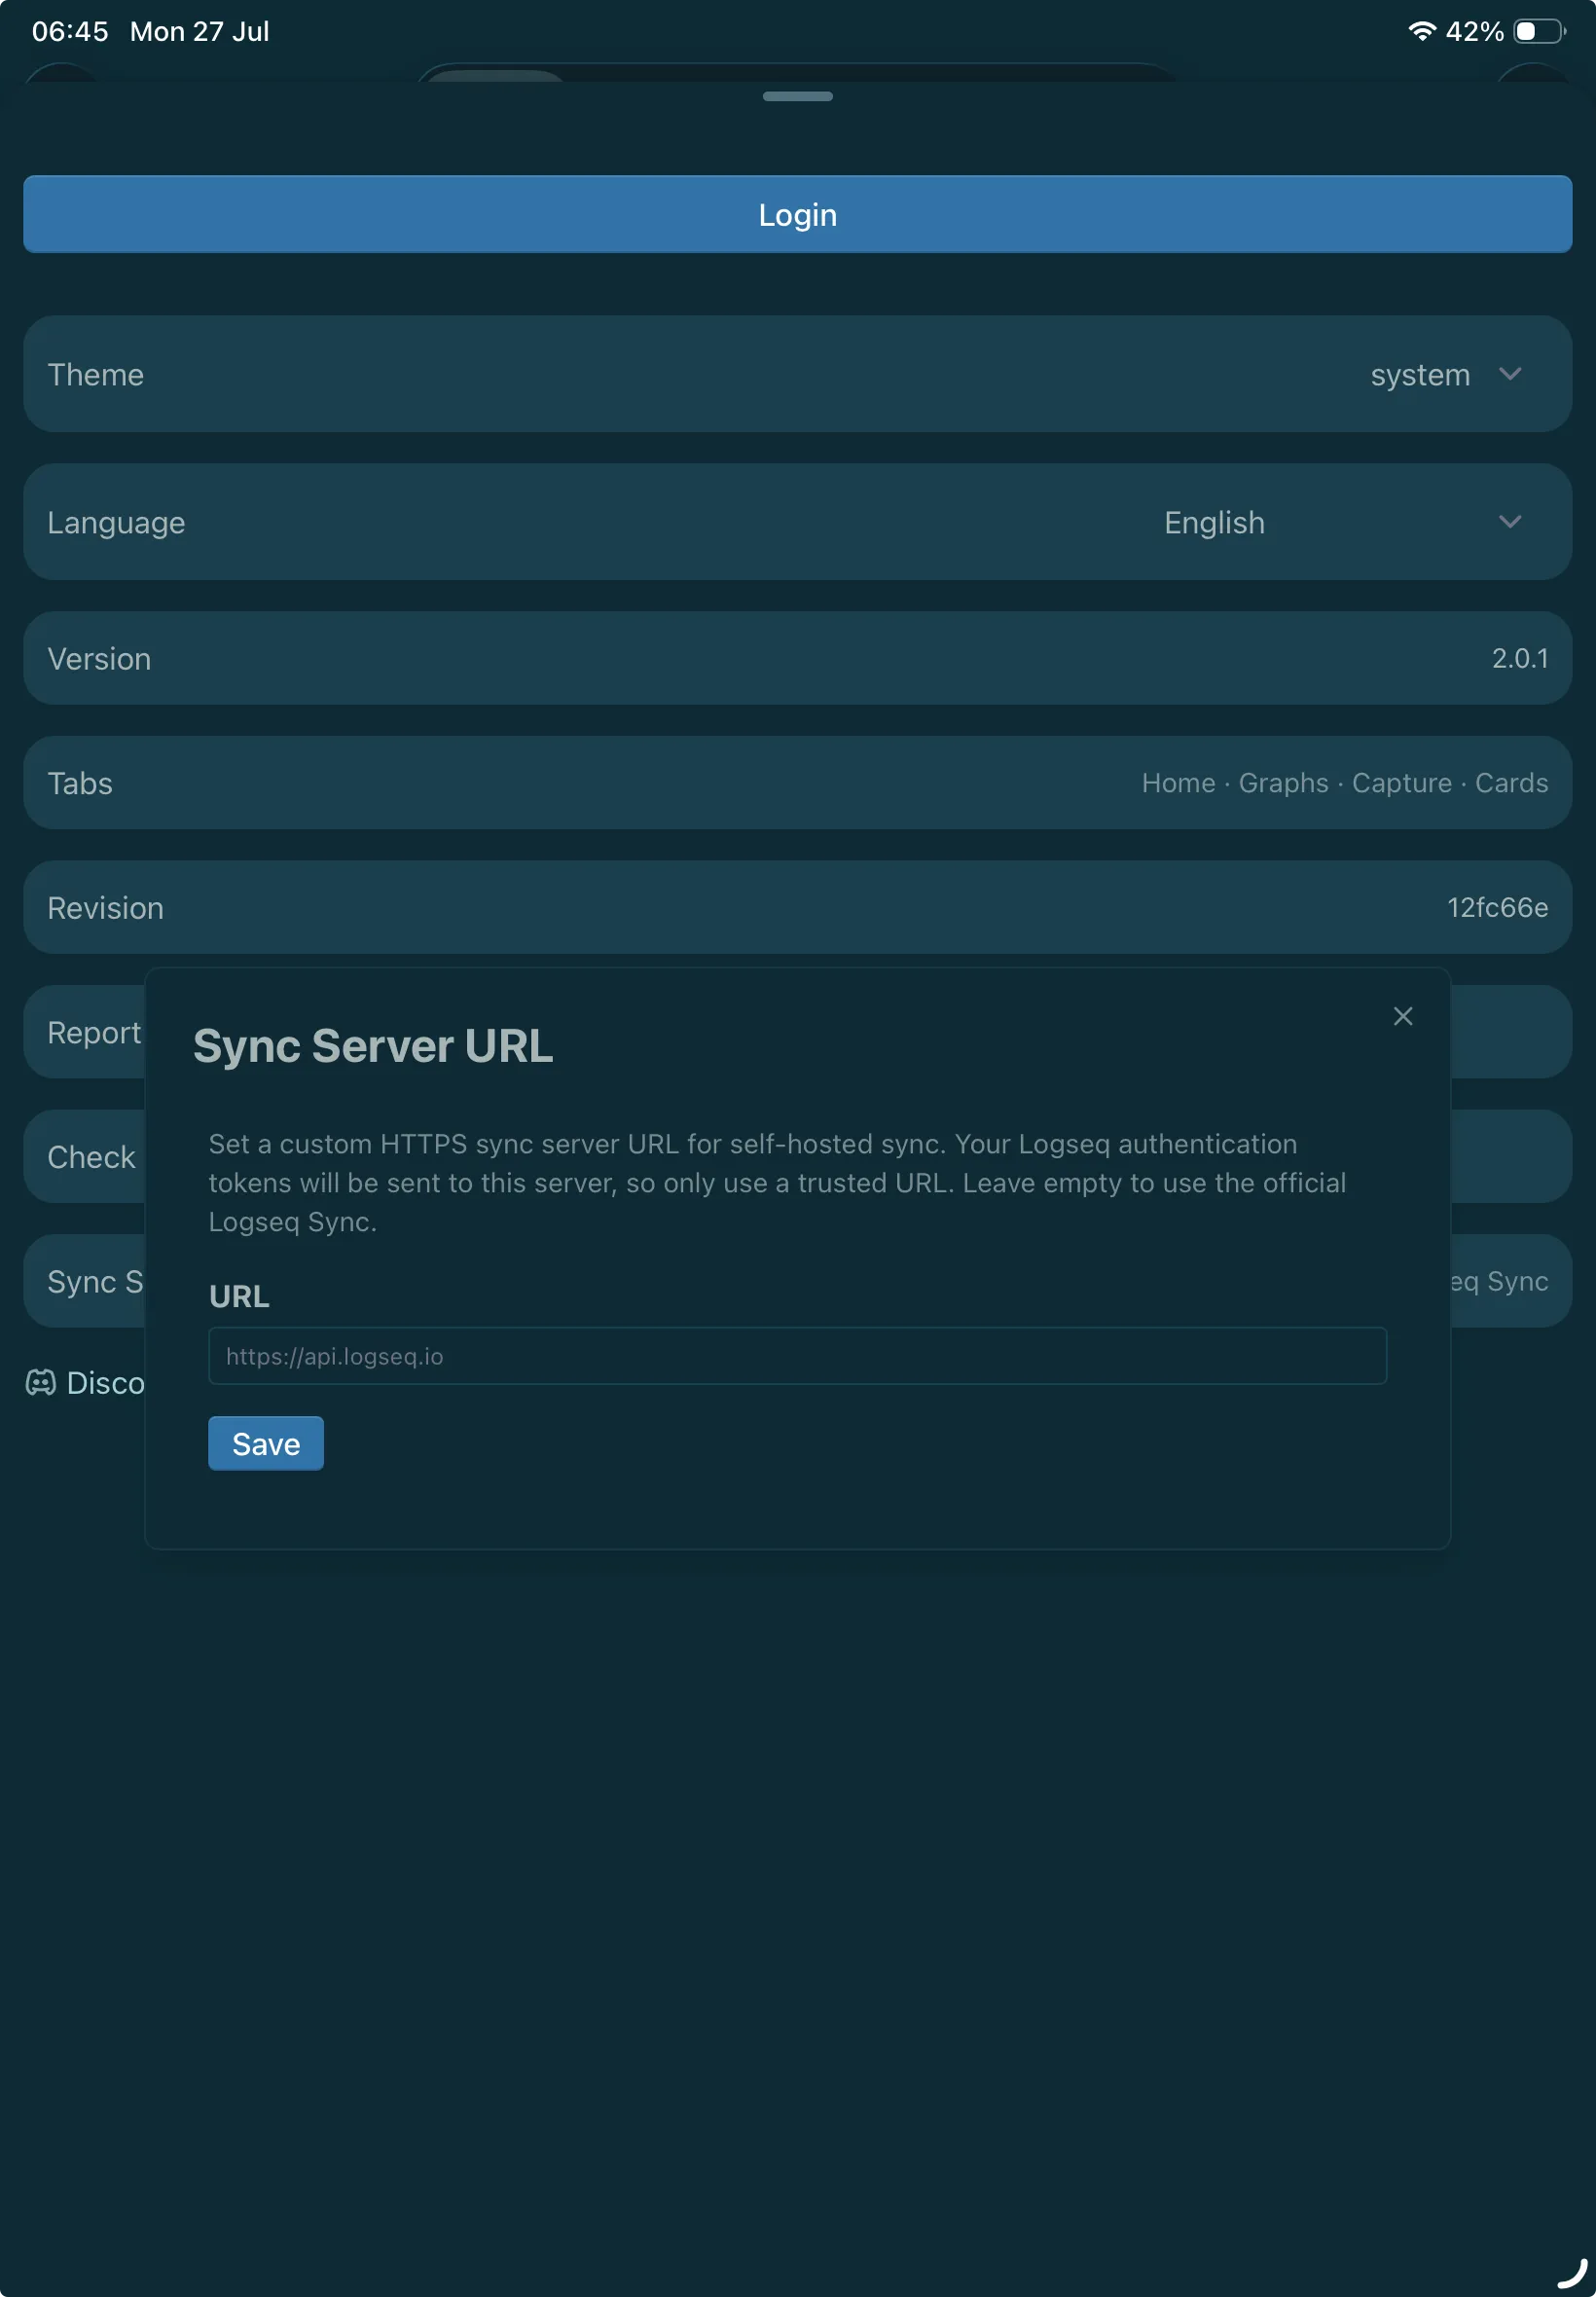
If successful, you should see a cloud icon with a green dot () signalling the sync status in the top right corner, next to . Clicking on it will display the current sync status.
Android
The latest Desktop client builds can be downloaded from Logseq’s GitHub: choose the .apk file from the Assets list.
In Logseq, login with your Logseq account (see Creating a Logseq Account), then add your server url to the Sync Server URL setting.
If successful, you should see a cloud icon with a green dot () signalling the sync status in the top right corner, next to . Clicking on it will display the current sync status.
If using
Tailscale, installTailscaleand sign in to the same tailnet.
On every device, make sure Use Logseq Sync Beta is enabled before creating a new graph or synchronizing an existing one.
Optional: Web and Publish servers
The Sync server is all you need to synchronize a DB graph. The same logseq-selfhost project also provides two optional services:
-
logseq-selfhost-web— the web application interface. -
logseq-selfhost-publish— the Publish server for sharing a graph.
If you need either feature, replace the Sync-only deployment with the full Sync + Web + Publish stack in my self-hosted-docker-setups repository. The expanded stack uses the same ./data directory for Sync and attaches all three containers to NPM’s network.
Create two additional DNS records:
logseq-web.example.comlogseq-publish.example.com
Then create proxy hosts pointing to:
| Service | Forward hostname | Internal port |
|---|---|---|
| Web | logseq-selfhost-web | 8080 |
| Publish | logseq-selfhost-publish | 8787 |
For both hosts, enable Force SSL and HTTP/2 Support. The Web proxy can use the same timeout configuration as Sync, while the Publish proxy should also allow long-running requests.
In Logseq, set:
- Publish Server URL:
https://logseq-publish.example.com
While the Publish server can also be exposed over Tailscale, the published pages will only be accessible on devices connected to your tailnet.
You can see the Publish server in action in the previous version of this guide, which is hosted using the same setup. That version also documents the complete combined Sync, Web, and Publish stack behind NGINX Proxy Manager.
For most personal setups, Tailscale is the simplest place to start. If you later need the reverse proxy route or want to publish Logseq DB pages publicly, replace the Tailscale deployment with the reverse proxy route.
Backing Up Your Data
The self-hosted Sync server has no built-in backup mechanism: everything a graph depends on (data/index.sqlite, each graph’s data/graphs/<graph-id>/db.sqlite, and the files in data/assets/) lives only on your server. If that directory is lost, so are the graphs synced through it.
logseq-sync-restic-backup is a script I wrote to automate this with restic, an encrypted, deduplicating backup tool. It briefly stops the Sync container, copies the live SQLite databases out with SQLite’s own .backup command (so a WAL/SHM file mid-write can’t corrupt the snapshot), restarts the container, then takes a restic snapshot of the copies plus data/assets/. Retention and, optionally, off-site replication with rclone are handled from the same script.
This works the same way regardless of which access route you chose above, since it operates on the data/ directory and Compose file directly rather than on the Sync API.
Prerequisites
- The Sync server already running, from either the Tailscale or reverse proxy setup above, so you have a
data/directory anddocker-compose.ymlto point the backup script at. -
resticandsqlite3installed on the machine running the backup (this can be the server itself, or another host with access to the samedata/directory). -
rclone, only if you want off-site replication.
Setup
-
Install
resticandsqlite3:brew install restic sqlite # or use your Linux distro's package manager -
Create a restic password file:
mkdir -p ~/.config/restic printf '%s\n' 'YOUR-RESTIC-PASSWORD' > ~/.config/restic/logseq-sync-password chmod 600 ~/.config/restic/logseq-sync-password -
Initialize a local restic repository:
restic -r /path/to/local/restic/repository \ --password-file ~/.config/restic/logseq-sync-password init -
Clone the backup repository and create your config:
git clone https://github.com/abhilesh/logseq-sync-restic-backup.git cd logseq-sync-restic-backup cp config.example.sh config.sh chmod +x backup-logseq-sync.sh -
Edit
config.shwith the required variables:Variable Value DATA_DIRPath to the Sync server’s data/directory from the setup aboveCOMPOSE_FILEAbsolute path to that deployment’s docker-compose.ymlSERVICE_NAMEThe Compose service name ( logseq-sync, or check withdocker compose config --services)LOG_FILEWhere the script should log to LOCAL_REPOSITORYThe restic repository path from step 3 LOCAL_PASSWORD_FILEThe password file from step 2 The retention policy (
KEEP_DAILY/KEEP_WEEKLY/KEEP_MONTHLY/KEEP_YEARLY, defaulting to7/4/6/1) and theBACKUP_TAGused to tag snapshots are also configurable inconfig.sh, but have sensible defaults. -
Run a backup manually to verify it works:
./backup-logseq-sync.sh
Scheduling
Once a manual run succeeds, schedule it with cron. Confirm the tools the script needs are on PATH for cron’s environment:
command -v docker restic sqlite3
Then add the relevant lines from cron.example via crontab -e; by default it runs nightly at 03:00.
Don’t run
crontab cron.exampledirectly, as that replaces your entire crontab. Copy the relevant line(s) intocrontab -einstead.
Optional: off-site replication
To also copy snapshots off-site (e.g. Google Drive), install and configure rclone:
brew install rclone
rclone config
# create a remote, e.g. "gdrive"
Seed an off-site repository from your local one, so both share the same deduplication chunking:
restic -r "rclone:gdrive:logseq-sync-backups" \
  --password-file ~/.config/restic/logseq-sync-offsite-password \
  init --from-repo /path/to/local/restic/repository \
  --from-password-file ~/.config/restic/logseq-sync-password \
  --copy-chunker-params
Then set in config.sh:
ENABLE_OFFSITE_COPY=true
OFFSITE_REPOSITORY="rclone:gdrive:logseq-sync-backups"
OFFSITE_PASSWORD_FILE="$HOME/.config/restic/logseq-sync-offsite-password"
restic also supports S3, SFTP, a REST server, Azure Blob, and Google Cloud Storage natively, without going through rclone.
Verifying backups
cat ~/logs/restic-logseq-sync.log

restic -r /path/to/local/restic/repository \
  --password-file ~/.config/restic/logseq-sync-password \
  snapshots --tag logseq-sync

docker compose -f /path/to/docker-compose.yml ps
Restoring
-
Restore a snapshot to a scratch directory first, rather than directly over live data:
restic -r /path/to/local/restic/repository \ --password-file ~/.config/restic/logseq-sync-password \ restore <snapshot-id> --target ~/logseq-restore-test - Stop the Sync container, move the current
data/directory aside, then copy the restoredindex.sqlite, each graph’sdb.sqlite, andassets/into its place. - Restart the container and confirm your graphs sync correctly from a client.
config.sh, the restic password file(s), and any cloud credentials contain secrets. Keep them out of version control. The repository’s.gitignorecovers the common cases, but double-check before committing if you fork or copy it.
Useful Links
Enjoy Reading This Article?
Here are some more articles you might like to read next: